node.js
Node scripts are not that different from the other JS scripts you’ve written in the past. You also need to put them on a filename with a .js extension. While nodeJS programs can be constructed in the REPL, that’s not how we will run the example scripts in this notes. Unless I specify otherwise, when you see a listing like the following;
Listing 1 - hellonode.js
setTimeout(()=> {
console.log("Hello");
}, 3000);

console.log("World");

// OUTPUT
"World", then after 3 seconds
"Hello"
It means the script needs to be saved in a file. Most of the time, the filename is specified as part of the Listing label, like Listing 1 above.
By the way, regarding Listing 1, this is an example of an asynchronous code written in nodeJS. There are two take-aways here, they are;
- Your code may not execute in the sequence your wrote them
- Sometimes, they might not execute in the sequence and order you intended
Many of the codes you will encounter in Node will be asynchronous, not unlike the timed-out Hello world example in Listing 1.
cmd Line arguments
Node captures arguments that were passed on the command line using the “process” object. This object is automatically included in all running node applications, so, we can reference this directly in our code. Edit the “hellonode.js” to include the following code.
if (process.argv.length > 2) {
  console.log(process.argv[2]); // print the first arg
}
Displaying Strings etc.
You can print pretty much display everything to the STDOUT using console.log(), thats why this is the go to function for simple log messages.This function can handle formatted strings pretty much like the C-Style printf.
console.log("This will display the number %d", 10); // This will display the number 10
console.log("I will count %d,%d,%d and %d", 1,2,3,4); // I will count 1,2,3 and 4


var name = "Joe";
console.log("Hi %s", name); // Hi Joe
If you need to work with formatted strings and don’t really need to display it in the console. You can use the util.format function.
var name = "Joe";
var str = util.format("Hi %s", name);
console.log(str); // Hi Joe
If your version of nodeJS is 6.x, you should be able to use the template string syntax of ES6. Like the following
var name = "Joe";
var str = `Hi ${name}`;  // these backticks, not single quotes
console.log(str); // Hi Joe
To create template strings
- Enclose the whole string to be composed in a pair of back ticks. The back tick character is found on the same key as the tilde (beside the numeric 1 key on top of your keyboard)
- Enclose the variable inside the template construct “${ var name}”
Async Codes
A typical (pseudo)code for accessing databases might look like this.
var cn = getConnection(cnString);
var stmt = conn.createStatement();
var rs = stmt.executeQuery(sqlStatement);


while (rs.next()) {
  console.log(rs.getString("lastname"));
  console.log(rs.getString("firstname"));
}
If we were to do this in Node, it will look very different
getConnection(cnString, (err, cn)=> {
  cn.createStatement((err, stmt)=> {
    stmt.executeQuery(sqlStatement,(err, rs)=> {
      while(rs.next()) {
         console.log(rs.getString("lastname"));
           console.log(rs.getString("firstname"));
      }
       rs.on('rowdata', (err, data) => {
      });
    });
  });
});
Some things to remember when using callbacks
- First parameter is always an error object
- Next parameter is the result
The following sample code shows how a function is invoked using a callback
var fs=require('fs');


function router() {
  readFromSomewhere(function(err, data){
    console.log(data);
  });
}


function readFromSomewhere(cb) {
  var returnval = "";
  return fs.readFile('myfile.txt', 'utf-8', function(err, d){
    if(!err){
      cb(null,d);
    }
    else {
      cb(err,null);
    }
  });
}


router();
console.log("This line may or may not execute before readFromSomewhere finishes");
TODO. Point out the following
- LHS and RHS
- How the LHS is mapped as the second argument of the callback function
Event Loop
[TODO]
Callback
The simplest callback
let foo = (arg) => {


}
[TODO] Write the explanation text here.
console.log("global space -> started");


//// CLIENT
let client = () => {


  let serverarg = 10;
  server(serverarg, (err,response)=> {
    console.log("client -> serverResponse : %d", response);
  });
  console.log("client -> started, server is called");
}


//// SERVER
let server = (arg, callback) => {


  let err = null;
  setTimeout(()=> {
    callback(err, arg * arg );
  },100);
  console.log("server -> started");
  console.log(`server -> arg ${arg}`);
}


client();
console.log("global space -> end");
[TODO]
Module, Require and Exports
Javascript didn’t (still doesn’t) have a standard way of managing code libraries. If you need functionalities that are external to your source file, you need to import or include it in your project using the script tag
<script src = "name of external file.js">
</script>
Many libraries tried to address this void in the JS ecosystem but eventually, only two competing libraries were left standing. These were AMD (Asynchronous Module Definition) and CommonJS. During the the early days of node up until 2013, Node used CommonJS but eventually moved away from it and used it’s own module and require system.
Module
A module is a file (mostly), but sometimes can also be a folder. If it is a folder, that folder needs to have a “index.js” file inside it. If it doesn’t have an index.js file inside it, it must have a “package.json” file which will specify what file will be loaded when the name of the module is required. The simplest scenario is that the name of the module is the name of a JS file.
[TODO]
Hello Web Server
Create a file named “server.js” and put the following codes in it.
var h = require('http');                            // <1>


var server = h.createServer(callmeBack);            // <2>


function callMeBack(req, res) {                     // <3>
  res.writeHead(200, {"Content-Type":"text/html"});
  res.write("<h1>Hello Node</h1>");
  res.end();
}


server.listen(3000);                                 // <4>
<1> pulls a library called “http” from the standard node library. When node was installed, the http library, together with a bunch of other libraries was also installed. The require method knows the location of these libraries
<2> The createServer method returns an http server object, the argument is a function which node will “call back” in the event that somebody tries to connect this server using any of the HTTP methods e.g. GET, POST, PUT, DELETE etc. This callback function, which we named “callMeBack” in our example, is typically known as a request handler because it is called once for every request the server gets
<3> The createServer will pass two objects to the callback function, these objects are the (1) http.ClientRequest and (2) http.ServerResponse — in that order. Both of these objects are created internally by the HTTP server and passed to the request handler (the “callMeBack” function) so we can deal with whatever data is inside the request object, and at the same time, so we can push whatever data we want to the requesting http agent (usually a browser).
<4> Finally, we start the server, in this example, we chose to open it at port 3000. The choice for port number is arbitrary, you can choose any integer from 1025 up to 65535 — port numbers 1024 and below are off limits by the OS because these are well known ports. If you are on a production environment, of course, you can choose port 80, but for purposes of practice and example, it’s best to stay away from 1024 and below.
To run the web server use the command
node server.js
To test if the web server is working, you can use the command
curl http://localhost:3000
Alternatively, you can open a web browser and navigate to http://localhost:3000. You should be able to see the output of our sample code.
Refactoring the sample code
var h = require('http');


var server = h.createServer(function(req, res) {    // <1>
  res.writeHead(200, {"Content-Type":"text/html"});
  res.write("<h1>Hello Node</h1>");
  res.end();
});


server.listen(3000);
<1> The “callmeBack” function was called only once in the code, so there is no advantage to be gained by making it a named function, except that it’s more readable and obvious to beginning programmers, thus making it a bit more approachable, and maybe for that reason it’s worth bothering to write it that way. But if not that, we extract the “callMeBack” function and plunk it right smack into “createServer” as an anonymous function. I have no strong opinion between this shorter version or our previous verbose version, but best get used to the shorter version because most code example of node code, looks a lot like this
If node is still running, you have to stop it (press CTRL + C twice) and start it again in order to reflect the changes in the source file. The starting and stopping of the server will be bothersome if you’re going to do it with such frequency. If you don’t want to be bothered by restart requirement every time the source file changes, you can use nodemon (short for node monitor) instead of node. You can get via npm like so
npm install -g nodemon
The “-g” flag means we’re telling npm to install nodemon globally instead of just the local folder (where you ran the command”. This way, we can use nodemon from any directory
NOTE
If you’re coming from a previous background of web programming, say, .NET, Java or PHP, the Hello Web server example in here is not the equivalent of ASP pages, Servlets/JSP or or PHP web pages. Node is a low level API for creating performant web servers — actually it can do more than that, but thats for another discussion. Think of Node, at least in this example, in terms of IIS, Tomcat and Apache webserver. The Hello Web Server example, is an example on how to create a web server, and not web pages
If you’ve written web apps before in PHP, Java or .NET, what we just did in the previous section might seem a bit primitive and quite off putting. In other web platforms, we didn’t have to create a web server, we would just create the html document or something that would transpile to html and leave the servicing of the documents to the web server. But don’t walk away just yet, programming in node is a low level enterprise but that is not a weakness, that is a strength. That hello world sample code above is just a bad sample, you’re not supposed to develop web applications like that. We’ll explore some more use cases and features of node in the up coming sections.
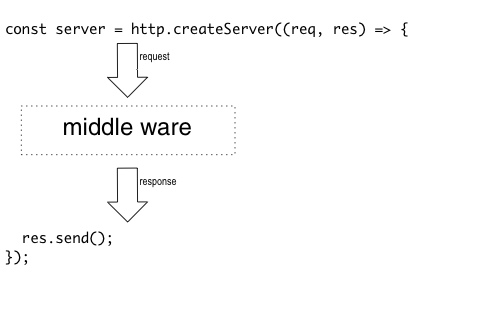
Middleware
It’s a piece of code that you put somewhere between createServer() call and before you do something with the actual request/response objects. It’s useful when you use it to filter, add or modify data as it comes through the http.ClientRequest before you reach the core business logic of your app.
Listing middleware-1 pseudo code, where a middleware might reside
const http = require('http');


const app = http.createServer((req, res)=> {


  switch(req.url) {
    /*
      A middle ware would insert itself
      right about in this place. It sits right after
      the request and response objects have been created
      internally by createServer() call, and right before
      you get you get to do anything with the actual
      request
    */
    case '/':
    case '/some/path':
    default:
  }

});
Fig middleware-1 where a middle ware resides
S
ome reasons for using middleware
- Gives you a chance to do something with the request object before the request hits your core business logic
- Useful for logging
- Also useful for authentication
What is it, how do we create it and how do we use it?
- A middleware is a function
- You need to inject it in your code right after http.ClientResponse and http.ServerResponse objects have been created. While it is possible to write your own code that will do all this injection, there are plenty out there that can already do this, one of the more popular packages is the connect framework
Example of a middleware
The following listing shows a typical code for a node webserver. What
const http = require('http');


const app = http.createServer((req, res)=> {
  // http handlers
});


app.listen(3000);
The connect middleware is a good example of a very basic middleware. Connect is inspired by some other frameworks that came before it e.g. Sinatra (Ruby) and NancyFX (.NET) . The connect middleware is not part of the core libraries. It’s an npm package. Before we can use it, we have to get it from the repository.
npm install connect --save
aaa
const http = require('http');
const connect = require('connect');  // <1>


const app = connect();               // <2>


http.createServer(app).listen(3000); // <3>
<1> Like most modules that we want to use in the app, we need to require it
<2> We call the connect function and assign it to a variable
<3> The connect object now effectively takes over the handling of the http.ClientRequest and http.ServerResponse. Naturally, createServer method will pass these two objects to the middleware.
const http = require('http');
const connect = require('connect');


const app = connect();


app.use((req, res) => {   // <1>
  res.writeHead(200, {'Content-Type':'text/plain'}); // <2>
  res.end("Hello connect");
});


http.createServer(app).listen(3000);
<1> The connect object still receives the request and response objects created by createServer method
<2> This code is a typical way to handle incoming requests and sending a basic response
If we were to use a middleware this way, there’s not much to be gained because we didn’t do anything differently, we just added an indirection in handling the request. Fortunately, this indirection allows us to do things like this.
const http = require('http');
const connect = require('connect');


const app = connect();


app.use((req, res, next) => {        // <1>
  req.username = authenticateUser(); // <2>
  next();                            // <3>
});


app.use((req, res, next) => {
  // do something else here          // <4>
  next();                            // <5>
});


app.use((req, res) => {              // <6>
  res.writeHead(200, {'Content-Type':'text/plain'});
  res.end("Hello connect");
});


http.createServer(app).listen(3000);
<1> We already know that our connect object receives the request and response objects from the createServer, in addition to these two objects, connect creates a third one called next. This is where the real power (and utility) of a middleware comes in. The next object allows us to chain calls to other middlewares, if there are any. To inject a middleware, we use the “connect.use” function and pass the middleware as the argument
<2> We can do lots of things in this middleware, but in this code, we are simply adding an attribute to the request object (JS objects are malleable, you can attach arbitrary properties or attributes to any object).This is just pseudocode, obviously we don’t have an implementation of the “authenticateUser” function. This code is only meant to illustrate the the possibility of things we can do inside a middleware
<3> Calling the next function, allows the chaining effect of middlewares to happen, it allow the control to flow to the next (available) middleware
<4> This is just another middleware in the chain, you can do something else in here e.g. parse the http.ClientRequest object, log something etc.
<5> We want the processing of request/response to continue on to the next middleware in the chain, sowe need to call next
<6> This is the end of the chain, technically, this block of code is still a middleware but it doesn’t call the next function anymore, so the request and response will finally be handled here and a response will be given to the user
IMPORTANT
The order in which you write the middleware is material. The middleware(s) will be executed in the order they appear in the code.
Complete listing of a sample code
const http = require('http');
const connect = require('connect');


const port = process.env.PORT || 3000;
const app = connect();


let logger = (req, res, next) => {
  console.log(`req.url : ${req.url} | method : ${req.method}`);
  next();
}


app.use((req, res, next)=> {
  req.username = "hagos,ted";
  next();
});
app.use(logger);
app.use((req, res)=>{
  if(req.url === '/') {
    res.writeHead(200, {'Content-Type':'text/plain'});
    res.end(`Hello connect | username : ${req.username}`);
  }
  else {
    res.writeHead(404, {'Content-Type':'text/plain'});
    res.end('You are lost');
  }
});


http.createServer(app).listen(port, ()=> {
  console.log("connect started on port %d", port);
});
Async Patterns
[TODO]
- Callbacks
- Events
- Promises
- Async Await
- Continuation patterns