No fluff introduction to Java
About Java
Generally, Java refers to these 3 things;
- A programming language
- A set of built-in libraries and technology frameworks
- A virtual machine. Developers affectionately refer to this as the runtime environment. You may hear some people call this by another name like JRE (Java Runtime Environment) or JVM (Java Virtual Machine). It’s all the same. In this book, I may refer to it as simply “runtime”
Some tidbits of info about Java;
- Was created by James Gosling sometime in the early 1990s
- Released by Sun Microsystems in 1995, so its’ quite long in the tooth now, but still growing strong
- Has nothing to do with JavaScript. It’s not a derivative nor a related language. Java is to JavaScript as car is to carpet. They only have common letters in their names
- In 2010, Oracle Corp. acquired Sun Microsystems,so, Java is now in the stewardship of Oracle
- The’re are implementions of the JDK and JVM other than the one from Oracle, OpenJDK is such as example; but in this book, I used Oracle JDK for all the examples. You can see all the other JVMs in here WikiPedia’s JVM list
- There are various certifications for the Java technology. If you want to know more about certifications, you can go to education.oracle.com
Java comes in various editions,
- Java SE (standard edition). Mostly used for desktop apps. This is what we’ll use for the most part of the book
- Java EE (enterprise edition). Used for building web applications, web services, high-availability back-end processes etc
- Java ME (micro edition). Used for running apps in the embedded devices. Think of IoT (internet of things)
A summary of the Java SDK versions is shown below.
| Version Name | Code Name | Release Date |
|---|---|---|
| JDK 1.0 | Oak | January 1996 |
| JDK 1.1 | (none) | February 1997 |
| J2SE 1.2 | Playground | December 1998 |
| J2SE 1.3 | Kestrel | May 2000 |
| J2SE 1.4 | Merlin | February 2002 |
| J2SE 5.0 | Tiger | September 2004 |
| Java SE 6 | Mustang | December 2006 |
| Java SE 7 | Dolphin | July 2011 |
| Java SE 8 | March 2014 | |
| Java SE 9 | September 2017 | |
| Java SE 10 | March 2018 | |
| Java SE 11 | September 2018 | |
| Java SE 12 | March 2019 |
A note about the JDK releases. Starting with Java 9, Oracle changed the cadence of release. It’s now on a very agressive 6-month cadence cycle. There is a good chance that by the time you read this, you’ll be using a different version of the JDK.
Should I care? Fair question. Given that there are many languages to choose from, why would you pick Java? There are many ways to answer it, one is to laboriously list the pros and cons and Java vs other languages, but that’s already done here and here, there are others but those two links should do it.
Setup
Depending on what OS you use and your preferences for editors or IDEs, there’s a couple of ways to install a Java development environment. The simplest way is to get it from Oracle site. The installer is available for Windows, Linux and macOS. You can download the currently stable version from the Oracle site, Java 11 download page. What you want to dowload is the Java Development Kit (JDK); not the JRE (Java runtime environment). You will need development kit to create Java programs.
The JDK has everything you need to write Java SE programs. All you need is a program editor or an IDE (integrated development environment). There are plenty of choices but I won’t list them here. My advice is to use whatever editor you are already using. Use the one you’re more comfortable with. Having said that, the most well-known IDEs are probably Eclipse, Netbeans and IntelliJ.
I’ve coded all the examples in the book using IntelliJ IDEA community edition. You don’t have to follow this setup, but if you want to use this, you can get it at JetBrain’s download page . It’s not difficult to install this IDE, in fact, it’s very straightforward. Download it, double-click and follow the prompts. You get to install it just like how you install your other software. It will also try to detect your JDK installation during the setup.
Basic workflow
We need some terminologies;
- JRE (Java Runtime Environment). You already know what this is, we discussed it before. You need this to run Java programs, but you cannot use this to create them. To create Java executables, you need to get the;
- JDK (Java Development Kit). This is a collection of libraries and command line tools. These are the tools you need to create Java programs
- Bytecodes are Java executable files. You run this inside the JVM
No matter what IDE or editor you choose to use, the basic steps when working with a Java program as follows;
- Write the program. Save it in file with a .java extension
- Compile it using the Java compiler (
javac), this tool turns your source file to Java bytecodes - Run the bytecodes on a VM appropriate for your platform
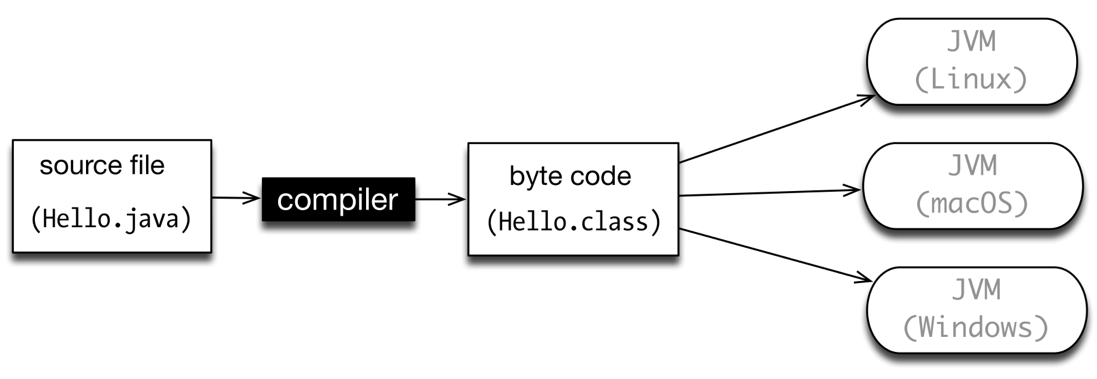
The figure above shows how a Java source file is created and executed using the JDK and JRE.
- You create a source file named Hello.java
- Compile it with
javac Hello.java, this step produces the file Hello.class (this is the bytecode) - Run the program on the JRE
java Hello
Depending on what toolchain you select, you will either be in the driver seat when these things happen or you’ll be in the passenger seat.
If you don’t use an IDE, that means you chose to work with the command line tools and and a program editor; you’ll be in the driver seat. You need to manage the compilation and execution steps by hand. If on the other hand, you chose to work with an IDE, these things are hidden from you. All you need to do is to click “Run”.
In the next section, we’ll build the actual “Hello.java” program.
Creating Project in IntelliJ
If you’re not using IntelliJ, you can skip this section entirely. Whatever tool or IDE you’re using, I suggest that you get familiar with the steps on how to create a project and/or a source file. That’s really all this section is about.
Any new development work in IntelliJ always starts by creating a project. We’ll create one now.
1) Start IntelliJ if it’s not started yet
2) If there aren’t any projects opened yet, click Create Project on the Welcome screen. Otherwise, from the main menu bar, click File > New > Project
3) In the left-hand pane, select Java
4) Specify the JDK you want to use in the project. You should be able to see the JDK 10 we downloaded earlier. Click Next
5) This next screen will ask if we want to create a project from a template. No thank you.
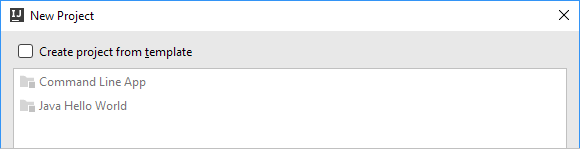
Don’t choose anything, just click Next
6) On the next page, specify the project name e.g. “HelloWorld”.
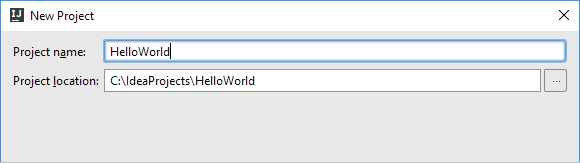
You can also change the project location that’s suggested by IntelliJ
7) Click Finish
Your project structure should look something like this
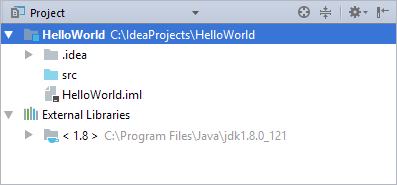
There are two top-level nodes;
- The Java module (HelloWorld). This is where we will work almost most of the time. The .idea folder and the HelloWorld.iml file holds the configuration data for your project and module. The src folder (short for source) is where we will store all our program source files
- External libraries. We don’t care about this one for now
Now that we have a project, we can create a source file. To create a new Java class source file, you can use the context-menu on the src folder (right-click on the src folder) then select New > Java Class. Name the new class “Hello”.
Okay. That’s all we really need to do in this chapter. We’ll write our Hello world program in the next chapter.
Hello
What we’d like to do here is simple, we want to print “Hello World” in the console. The statement that will do that is this
System.out.println("Hello World");
But we can’t just write that line in a source file, compile, then run. We need to observe some rules of the language before we can successfully run the program. The first two, among the many, Java rules that we need to learn are the following;
- If you want your program to do something productive when you run it, like print something, you need to write a main function
- Everything in Java has to be written inside a class
A program that prints “Hello World” in Java, looks like this
class Hello {  // (1)
    public static void main(String []args) {  // (2)
      System.out.println("Hello"); // (3)
    }
}
(1) Think of a class as unit of organization, in the same way that a function is also a unit of orgranization. A function organizes statement by enclosing them in its body . Hence, we call a function a “named collection of statements”. A class on the other hand, is a named collection of functions and variables (properties). We’ll settle for this definition of a class, for now. We can revise the definition as we go along
(2) Ignore the words static, void and public, at least for now. The name of the function here is main(String []args). The parameter is an array of Strings, you won’t need to bother with this parameter most of the time, so we’ll ignore it for now. A function’s name is chosen by the programmer (you), so you can name your function anything you want; but main is a special name
(3) This is the only statement we care about. It’s the one that actually does the printing
I> Functions in Java are called methods. It’s the term tha Java developers use when they refer to functions. So, we’ll start using this term from hereon
Remember the following when you write Java programs;
- Java programs are case-sensitive, so
mainis different fromMain, the former is recognized by the runtime as a valid entry point for a program, the latter is not. Another example,staticis different fromStatic, the former is a valid Java keyword, the latter is not - Java statements are terminated by a semi-colon. If you forget to put the semi-colon, you won’t be able to compile your codes. You’ll get errors
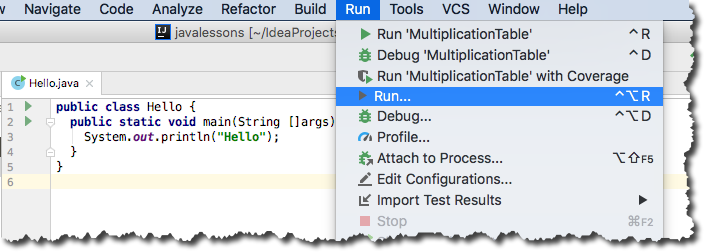
To run the code, go to the main menu bar, then Run > Run, as show in the picture below
You only need to do this once (per source file). IntelliJ needs to know your Run configuration. You can set it in this next screen.
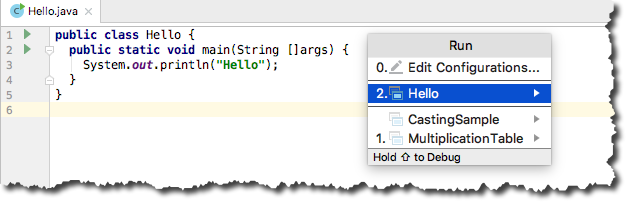
Choose “Hello”. That should run it. You only have do this run configuration during the first time you will compile and run a source file. For subsequent runs, you can simply press CTRL + R (macOS) or Shift + F10 (Linux or Windows).
Okay. Now you know how to create a project and Java source files, you should be able to try out the coding examples.
Quick Tour of the language
Generally, Java programs are organized this way
- statements and expression are written inside methods
- methods are written inside classes
- variables can be written inside methods; in which case, they are called local variables. They can also be written inside classes (the same level as methods), in which case, they are called member variables. Some programmers call them properties (member variables). I actually like to call them properties too, it’s shorter
- properties and methods make up a class
- classes can be organized into a package. A package is just a folder that contains classes. We can call it a “named collection of classes”. Some programmers also it a namespace
Variables
You can use variables to store data, any kind of data. Working with variables generally goes like this;
- Choose the type of data. Basically, you’re deciding what kind of data this variable will store, will it be a number, String, boolean etc.
- Name the variable. It’s your responsibility to name your variables, so choose them well. There are rules to follow when naming them; we’ll get to that in a minute
- Optionally, you can assign a value to the variable
Let’s look at some examples
int somenumber;  // (1)
somenumber = 10; // (2)

int anothernumber = 1; // (3)
(1) The name of the variable is somenumber and its type is int. We didn’t assign a value to it immediately. You can generally do this, you can declare them but not yet assign a value. Late initialization is mostly okay. Notice that the type (int) is written on the left of variable name (somenumber). This is the proper way to declare a variable
(2) Here, we get to assign a value to somenumber, 10 is an integer literal, we can assign it to somenumber because it’s type is int (an integer). If you assign a value other than an integer, like a String or a boolean, that won’t work. You’ll get an error.
(3) Here, we declare and assign a value to the variable on the same line
The type of a variable or the type of a data dictates what you can do with the variable, what kinds of operations are allowed. If it’s a numeric type, you can be sure that all the math operator will work on it. It wouldn’t make sense to use math operator on boolean types, just like it wouldn’t make sense to use boolean or logical operators on String types.
Each data type in Java responds to a defined set of operations. This is the reason why Java won’t allow you to store a String data in an int variable, for example.
int a = 10; // ok
a = "10"; // not ok, compiler will complain
This is the reason why Java is called a strongly typed language. You can only set the type of a variable once; and once you did that, you cannot change it anymore. That’s strong typing.
You must have also noticed that Java forced us to declare the type of a variable even before we could do anything with it.
int mvar = 10; // ok
nvar = 10 // not ok
Declaring the type of variable is not optional. Java forces us to do this so that the compiler can know what kind of data, and hence, what kind of operations are valid on the data. The compiler can catch many kinds of programmer errors if it knows the type beforehand. This is the reason Java is called a statically typed language. Static typing means that you declare the type of the variable at the same time you create the variable. It’s not the compiler’s responsibility to guess or infer what kind of data you’re using. You have to be explicit.
The language comes with 8 built-in types, they’re affectionately called primitive or native types. They’re shown in the table below.
| Type | size in bits | sample |
|---|---|---|
byte |
8 | -128 to 127 |
short |
16 | -32_768 to 32_767 |
int |
32 | 2_147_483_648 to 2_147_483_647 |
long |
64 | -9_223_372_036_854_775_808 to 9_223_372_036_854_807 |
float |
32 | 1.23e100f, -1.23e-100f, .3f, 3.14F |
double |
64 | 1.23456e300d, -1.23456e-300d, 1e1d |
char |
16 | 0 - 65535 or \u0000 - \uFFFF |
boolean |
1 | true or false |
Notice the underscores in the sample integers above? Since Java 7, you can put underscores in integer literals. It makes it easier to group large integers. You should be able to spot thousandth, hundred thousandth or millionth posistion of your literals, like this
short slimit = 32_767;
When naming your variables, best remember these rules. A variable’s name;
- Can’t start with a number. The name can include a number but it can’t start with it (mandatory)
- Can’t contain spaces or special characters (mandatory)
- Can’t be the same as a Java keyword (mandatory)
- Is descriptive. You have to be able to tell what kind of data it’s carrying just by its name (not mandatory, but good advice)
- Has good length. The name can be of any length, but just remember that you have to type it, many times over (not mandatory, but good advice)
- Can begin with an underscore or a dollar sign, but this is discouraged, so, quickly forget about this one
These rules don’t apply only to variable names. They also apply to names of classes and methods
The list of Java keyword are shown below.
abstract.   continue  for         new         switch
assert***   default   goto*       package     synchronized
boolean     do        if          private     this
break.      double    implements  protected   throw
byte        else      import      public      throws
case        enum      instanceof  return      transient
catch       extends   int         short       try
char        final     interface   static      void
class       finally   long        strictfp**  volatile
const*      float     native      super       while

*     not used
**    added in JDK 1.2
***   added in JDK 1.4
****  added JDK 1.5
Expressions
When you combine variables, literals and operators, you get an expression. Here are some samples
1 + 2
a - 1
inches * 2.54
Expressions results to something. You can assign the result to a variable, like this
int mvar = 1 + 2;
1 + 2 is an expression, the moment you assign the result to a variable, it becomes a statement; notice the semi-colon?
Statements, unlike expressions, do not produce a result.
Statements
Statements are things that do something, like print that, assign this to that. Some examples of Java statements are shown below.
System.out.println("Hello");  // (1)
int a = 1;  // (2)
float b = 1 + 3; // (3)
double c = b + 10; // (4)
float factor = 2.54;
float cm = c * factor; // (5)
(1) Print something
(2) We’re assigning an int literal to a
(3) We’re assigning the result of the math expression 1 + 3 to b
(4) Expressions can have a mix of variables and literals as an operand
(5) Sometimes, the operands in an expression are all variables
Comments
You can put comments in your code. The compiler ignores them, so it’s a good way to document your code. Java has 3 kinds of it, the single line comment, multiline comment and the Javadoc comment.
In a single line or inline comment, everything to the right of the forward slashes until the end of the line is ignored.
// single line comment
In a multiline comment, also called C-style comment, everything in between /**/ are ignored.
/*
A multi-line comment, it can span
many lines
*/
Javadoc comment.
/**
This is a Javadoc style comment. When you write your comments
like this, it will be picked up by the Javadoc tool which can
create HTML documentations for you
*/
Operators
Java operator are generally intuitive, they do what you think they do.
= This is the assignment operator. You’ve seen it before. Whatever is the RHS (right hand side) gets stored or assigned to the variable on the LHS (left hand side), for example;
boolean mvar = anothervar > 10;
+ - / * % These are the math operators. They work on numeric types (with the exception of the plus sign which also works on String types).
+ - ++ — ! These are unary operators. They’re called that because unlike the other operators (binary), these are used on a single operand. Like this
int counter = 0;
counter++; // adds 1 to counter
++counter; // subtracts 1 from counter

boolean marg = true;
marg = !marg; // (1)
(1) ! means not. So, the initial value of marg is true; !marg means not true, hence false. We assigning false to be the new value of marg.
== < > >= <= != These are the equality and relational operators. You use these to express equivalence of operands. An expression that uses any of these operator gives out boolean results. For example
int a = 10;
int b = 11;
boolean c = a > b; // false
&& || ?: & | The conditional operators works on boolean type operands.
boolean a = true;
boolean b = false;
boolean c = a & b; // false
boolean d = a && b; // also false
boolean e = a | b; //  true
boolean f = a || b; // also true
& This is the logical and operator. For an expression to be true, both operands have to true, since only a is true, a & b results to false
| This is the logical or operator. For an expression to be true, only one of the operands has to be true. Since a is true, the expressions results to true.
&& This is also a logical and but this is the short-circuit version. If you use this and it detects that the first operand is already false, it won’t bother checking if the other operand is true or false. It will short-circuit the operation, and yield false. The non-short-circuit verion evaluates both operands.
|| This is also the logical or but it’s the short circuit version. If you use this, and it detects the first operand to be true, it won’t bother checking the other operand, it will short-circuit the operation and yield true. The non-short-circuit verion evaluates both operands.
Methods
Methods are a named collection of statements. They’re always written inside classes and you cannot nest them in other methods. Like variables, you get to pick their name and their type. An example of a method that returns an int is found below.
int convertInchesToCm(int inches) {
  return inches * 2.54;
}
When a method doesn’t have to return anything, use thje void return type, like this
void talk() {
  System.out.println("Hello");
}
Classes
Classes can contain method and member variables, like this
class Person {
  String firstname = "John";
  String lastname = "Doe";

    void talk() {
      System.out.printf("Hello %s %s", firstname, lastname);
    }
}
There’s a lot more going with classes than what’s shown above, but we’ll get to that in a later section.
Strings
Strings are not part of Java’s built-in or primitive types, it’s a reference type. We haven’t discussed reference types yet, but we’ve been using Strings in some of our examples. We might as well learn a little bit abouth this type.
Java has a char type, if you need to work with individual characters, this is data type you wanna look at; but most of the time, we tend to work with sequences of characters and we deal with them as a bunch, rather than individually. That’s where Strings come in.
A String data type stores a sequence of individual characters using the UTF-16 encoding, so it can store pretty much anything.
You can define a String variable by enclosing a sequence of letter in double quotes, like this.
String mvar = "Hello";
You can’t use single quotes to define Strings. Java uses single quotes to define chars, not Strings.
You can add Strings using the plus sign (math addition symbol), like this
String a = "Hello";
String b = "World";
String c = a + b;
W> Combining Strings using the plus sign is not a memory-efficient way of concatenation. We’ll get back to this topic when we discuss the String class in more detail; that will be in a later chapter.
Up-casting and down-casting
You can assign a value to a variable whose type is wider than that of the value’s. This is called up-casting, and it happens automatically. For example
int ivar = 10;
long lvar = ivar; // long is wider than int
The double type is widest in all numeric primitive types and byte is the narrowest type. You can think of the hierarchy this way; double > float > long > int > short > byte. The following program illustates this point.
public class CastingSample {
  public static void main(String args[]) {
    byte b = 1;
    short s = b;
    int i = s;
    long l = i;
    float f = l;
    double d = f;
    System.out.printf("double d = %s", d); // prints 1.0
  }
}
Down-casting is when you assign a value to variable whose type is narrower than that of the value’s; but that does not happen automatically, unlike in up-casting. To perform a down-cast, you need to use the cast operator. Like in the following code.
long lvar = 10;
int ivar = (int) lvar; // (int) is the cast operator
The cast operator needs to be at the left of the value to be casted (lvar). Put the target type inside the parentheses. In the example above, we’d like to cast lvar, which is long, to an int, hence we put the (int) inside the parentheses. Now that lvar is an an int, we can store in in ivar which is an int.
If then statement
You can side-step some statements in your code. The if-then statement will lets you run some statements selectively. You can choose to run which statements will run depending on some conditions.
The first form of this statement looks like this
if (a > b) {
  System.out.printf("%s is greater than %s", a, b);
}
The if statement takes a boolean expression (a> b) and evaluates it. If it’s true, it executes all the statements in the block, as shown in the code above.
The second form of this statement looks like this
if (a > b) {
  System.out.printf("%s is greater than %s", a, b);
}
else {
  System.out.printf("%s is greater than %s", b, a);
}
It looks straightforward doesn’ t it? If the condition (a > b) isn’t true, then all the statements in the else block will be executed.
The third form looks like this
import java.util.Calendar;
import java.util.Date;

Calendar c = Calendar.getInstance();
Date d = new Date();
c.setTime(d);

int dayOfWeek = c.get(Calendar.DAY_OF_WEEK);

// Next, print out friendly name for the
// current day of week

if (dayOfWeek == 1) {
  System.out.println("Sunday");
}
else if (dayOfWeek == 2) {
  System.out.println("Monday");
}
else if (dayOfWeek == 3) {
  System.out.println("Tuesday");
}
else if (dayOfWeek == 4) {
  System.out.println("Wednesday");
}
else if (dayOfWeek == 5) {
  System.out.println("Thursday");
}
else if (dayOfWeek == 6) {
  System.out.println("Friday");
}
else if (dayOfWeek == 7) {
  System.out.println("Saturday");
}
Don’t be bothered by the first 5 lines, we’ll get to those kinds of statements shortly. What’s important to know is that the first 5 lines simply gets the current date and puts it on Calendar object. The 6th line gets the “day of the week” value of the Calendar object. This value is an integer and the range of its possible values are 1..7; 1=Sun, 2=Mon, 3=Tue etc.
You can use the else if clause if you need to account for multiple pathways, like the code above.
Switch statement
The switch statement has a slightly different structure from the if-then statement which makes it, in some cases, more readable than an if-else if . The basic form of the switch statement is as follows
switch(expr) {
  case value:
    statement;
    break;
  case value:
    statement;
    break;
  default:
    statement;
}
Where expr is either a byte, short, char int or String type (String was added in Java 7). Let’s try it with the Calendar example.
Calendar c = Calendar.getInstance();
Date d = new Date();
c.setTime(d);

int dayOfWeek = c.get(Calendar.DAY_OF_WEEK);
String day = "";

switch(dayOfWeek) {
  case 1:
    day = "Sunday";
    break;
  case 2:
    day = "Monday";
    break;
  case 3:
    day = "Tuesday";
    break;
  case 4:
    day = "Wednesday";
    break;
  case 5:
    day = "Thursday";
    break;
  case 6:
    day = "Friday";
    break;
  case 7:
    day = "Saturday";
    break;
  default:
    day = "Dunno";
}

System.out.printf("Today is %s", day);
While loop
When you need to run a group of statement repeated or loop through them, you can use the while statement. The basic form looks like this.
while (condition) {
  /*
  1. execute some statements
  2. but make sure that you do something
     to make the condition false
     at some point in time; otherwise
     you just keep on looping
  */
}
The basic is idea is that while the condition is still true, you keep on running all the statements inside the body of the loop; everything in between the pair of curly brace is the body of the loop.
int count = 0;  // (1)
while(count < 11) {  // (2)

  System.out.println(count);
  count++; // (3)
}  // (4)
(1) initialize count to 0. This is the counter variable
(2) The guard condition of the while loop is evaluated for first time, at this point, the value of the count variable is zero, the condition evaluates to true and we enter the loop’s body
(3) The count variable is incremented using one of the shorthand operators, count is now equal to 1
(4) We reach the closing curly brace which is the end of the while loop. Program control goes back to beginning of the loop, the condition is evaluated for the second time. The count variable is still less than 11 so we enter the loop again. This will go on until the value of count will be equal to 11, at which point, we will no longer enter the body of the loop and the program control jumps to the closing curly brace; it’s the end of the loop.
Java has another variation of the while loop, it’s called the do while loop. It’s basic form as as follows.
do {
  statements;
} while (condition)
It’s almost the same as the while loop in the do while, the statement inside the block are guaranteed to be executed at least once; it’s because the condition is checked at the tail-end of the statement. So, even if the condition is false to begin with, you would have already ran through the statements.
For loop
The for statement is another construct that you can use to loop through statements. It’s basic form is as follows.
for (init value;condition;increment/decrement) {
  statements;
}
Where;
- init value declares or defines the initial value of variable. This variable us typically used as a counter (like count in our while loop example)
- condition is a boolean expression. The runtime evalutes this condition each time it enters the loop, as long as the condition is true, the runtime keeps on running the statments inside the block
- increment or decrement are math expressions. It typically uses the unary operator ++ or – to increase or decrease the value of a counter
Let’s see an example
for(int count = 0; count < 11; count++) { // (1)(2)(3)
  System.out.println(count); // (4)
}
(1) A counter variable named count is initialized to zero
(2) A conditional expression (count < 11) is set to determine how many times we will go inside the loop
(3) The count variable’s value is increased by 1 using one of the shorthand operators
(4) Value of count is printed on the screen
There are two Java keywords that operate on loops, both the for and while loop variants. These keywords are break and continue. When they are used inside loops, they have the same effect; they both terminate the execution of the loop. They have a very slight difference, which we’ll explore now.
When you use continue in a either a while or for loop, this is what happens;
while (condition) {
  statement 1;
  statement 2;
  continue;
  statement 3;
  statement 4;
}
When the runtime encounters the continue keyword, statements 3 and 4 will no longer be executed. The control will go back to the beginning of the loop, so you will have a chance to check if the condition on the while loop is still valid.
Let’s see what happens if we use break;
while (condition) {
  statement 1;
  statement 2;
  break;
  statement 3;
  statement 4;
}
When the break keyword is used, statements 3 and 4 will also be ignored, just like the case in continue, but instead of going back to the beginning of the loop, the program control will transfer to the first statement after the closing curly brace.
I don’t recommend the use of break and continue because it’s much cleaner to start and end loops with respect to a condition. That’s not an absolute thing, of course there will be times when you will need to use either one of these keywords, but that should be the exception, rather than the rule.
Sample program, FizzBuzz
Let’s put our chops into practice. We’ll do two simple exercises, the fizz-buzz problem and the multiplication table problem. Very popular amongst students and beginner programmers. We’ll do the fizzbuzz first.
For the fizzbuzz program, what we want to do is this;
- count from 1 to 100
- if the value of count is exactly divisible by 3, print “fizz”
- if count is divisible by 5, print “buzz”
- if count is both divisible by both 3 and 5, print “fizzbuzz”
Let’s see how that looks in code.
class FizzBuzz {
  public static void main (String [] args){
    for (int i = 1; i <= 100 ; i++ ) {  // (1)
      if ( i % 15 == 0) { // (2)
        System.out.printf("FizzBuzz %d ", i);
      }
      else if (i % 5 == 0) {
        System.out.printf("Buzz %d ", i); // (3)
      }
      else if(i % 3 == 0) {  // (4)
        System.out.printf("Fizz %d ", i);
      }
    }
  }
}
(1) Count from 1 to 100, that’s easy enough to do with a for loop (2) Check if the current value of i is divisible by both 3 and 5, if it is, print “FizzBuzz” (3) If the number is not divisible by 3x5, is it divisible just by 3 then? If it is, print “Fizz” (4) If the number is not divisible by 3x5 and not divisible by 3, is divisible by 5? If it is, print “Buzz”. This is the last condition that we will check, because only these three conditions are stated on the problem
Sample Program, multiplication table
This is an exercise on nested loops, the goal is to output something like this
1	2	3	4	5
2	4	6	8	10
3	6	9	12	15
4	8	12	16	20
5	10	15	20	25
Let’s see how that looks in code
public class MultiplicationTable {
  public static void main(String []args) {
    int tablesize = 5;
    for (int i=1; i <= tablesize; i++) {
      for (int j=1; j <= tablesize; j++) {
        System.out.printf("%d\t", i * j);
      }
      System.out.println("");
    }
  }
}
To follow the code, I suggest that you try simulate this program by hand. On the first for loop write the value of the i in a piece of paper, then go to the next inner for loop and write the value of j on the same piece of paper. Then write the result of the i * j on the same piece of paper (That simulates the printf).
Next, go back to the beginning of the inner for loop ( that’s where you go back to, not the outer for loop). Java loops, when nested, has to be resolved from inside going out. Until the inner for loop is exhausted, that’s where you go back to.
So, by now, the value of j has increased by 1 while i has stayed the same. Write down the value of i, j and their product for every iteration of the inner loop. At some point when j reaches 6, you will exit the inner loop, then encounter the closing curly brace of the outer loop, and go back to the beginning of outer loop. Now i will increase by 1. You will do this until i’s value is 6. Hopefully by then, you’ll see how the code works.
Errors and Exception Handling
You will encounter errors. That’s for sure. There are three kinds of them, compiler, runtime and logic errors. Let’s look at each one of them.
Compiler errors
This happens when you don’t follow correct syntax. That’s why this is also called syntax errors. Java is a compiled languaged, its compiler checks your code against some set of rules. If your code violate some rules, like, forgetting the semi-colon, misspelling some keywords, referring to a variable that you haven’t defined yet or you forgot to close a String literal etc., the compiler will throw an error.
Examples of some common compiler errors (compiled from stackoverflow.com) are found below
- “…expected” - probably because of a missing semi-colon or a missing pair parentheses
- “unclosed String literal” - quite obvious, you missed a closing double quote
- “cannot find symbol” - when you try to refer to a variable that you haven’t defined yet. It would have been more helpful if this error said “variable name not found”
If you use IDE’s like Eclipse, Netbeans or IntelliJ (or even Visual Studio Code with the right plugins), the IDE will give enough visual cues, even as you’re typing the code. The following picture shows a bubble warning that shows the error.
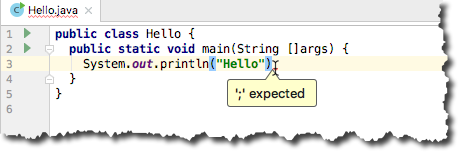
To fix compiler errors, you just need to fix the syntax. It’s easy to fix broken syntax most of the time, especially if you use a full blown IDE.
Runtime errors
As the name of the error implies, it happens at runtime. The Java runtime spits out these errors when your program encounters a situation it didn’t expect. It’s not something that you or the compiler could have seen at the time you were writing the code (in other words, at design time). Your code may compile successfully but it may stop running when something in the enrivonment doesn’t agree with what your program wants to do. There are many examples of these things e.g.;
- You tried to reference a specific element of an array, but the element doesn’ t exist (ArrayIndexOutOfBoundsException)
- Your code performed a math operation on integers, maybe division. The divisor turned out to be zero. A divide by zero operation on integers will result in an ArithmeticException
- You tried to open a file, for some reason, the file couldn’t be opened. Maybe it was corrupted or your program didn’t have sufficient permission to open the file
- You tried to read something from the internet, maybe the network was down at the time
You get the idea. There are many things that can happen on the runtime environment that you just can’t predict. The only way to deal with this kind of error is to use Java’s ty-catch mechanism.
The try-catch looks like this
try {
  codes that may encounter
  problems
}
catch(Exception e) {
  what you will do when a problem
  happens
}
The try-catch construction is very similar to the if-then construction. They both redirect program flow depending on a condition. In the case of try-catch, we can say the following statements;
- All of the statements inside the try block will be executed if no Exceptions will be raised by the runtime, in which case, none of the codes in the catch block(s) will be executed
- When one of the statements inside the try block encounters an error, at which point the runtime will raise an Exception, all the statements below the offending statement will no longer be executed. The program flow will jump to beginning of the catch blocks (there can be multiple catch blocks). The runtime will go through all the catch blocks and try to match the raised Exception with what’s declared on each of the catch block. When a match is found, the statements in the matching catch block’s body will be executed
We’ll have more discussions about Exceptions and the try-catch construction in the coming chapters.
Logic errors
Logic errors are the hardest to find. As its name suggest, it’s an error on your
logic. When your code is not doing what you thought it should be doing, that’s
logic error. The only way to solve this is if you walk through your code slowly and see what’s happening. Many programmers use System.out.println in strategic places in their codes to confirm whether certain things are happening or if their expected program flow is being followed. You can use your IDE’s debugging capabilities to inspect your code. The popular IDEs will let you put breakpoints in your code, these breakpoints will let you run your program in debug mode and then halt execution when it reaches the breakpoint. It lets you pause and continue the execution of your program at strategic points. It’s a good idea to invest some time to discover the debugging capabilities of your IDE
Getting input
Glossary
Exercises
End of Part 1
I hope you were able to get something from this really quick introduction to the Java language. In Part 2, we’ll look at the following;
- Object Oriented concepts
- Types, classes and constructors
- Interfaces and abstract classes
- Some of the most common Java classes e.g. String, Data, Calendar, Math
This tutorial is lifted from the book “Java Lessons”. If you want to support the book, you might want to consider buying it at LeanPub. You’ll get the nicely formatted DRM-Free PDF, Mobi and EPub version of the book.

Revision history
| version | date | description |
|---|---|---|
| 1 | 07.19.2012 | First draft. It was encoded in Latex, and released as PDF |
| 1.1 | 04.07.2012 | Moved to markeddown format |
| 1.3 | 05.02.2015 | Used as material for LeanPub, Java Lessons |
| 2 | 10.01.2017 | Revised for use in Apress book (Learn Android Studio 3) |
| 3 | 06.01.2017 | Rewritten. Removed the detailed discussions, it will now follow the format of Cliff’s notes |
| 4 | 10.03.2018 | Revised for Java 10, 11 |